Verifying a crypto transfer on a blockchain explorer usually takes a few minutes: open the explorer for the correct network, paste the TXID, then confirm status, amount, destination, fee, and confirmation count—without entering any private key. The loop is the same whether you send BTC, ETH, or a token.
This how-to assumes basic familiarity with What is a blockchain explorer. A block explorer (also called a blockchain explorer) is a read-only lookup surface for public ledger entries. To verify a transfer, look up the hash or address on the matching explorer and compare the recorded fields with what you expected. Difficulty is beginner; the main failure mode is wrong network selection, not complex cryptography. Start from the sending wallet or exchange withdrawal screen, where the TXID (transaction hash) first appears after broadcast. Prefer the full hash string over a screenshot—images often omit the identifier you need to find the page.
What You Need Before You Start
Gather three items: the network name used for the send (for example Bitcoin, Ethereum, BNB Smart Chain, or XRP Ledger), the TXID, and the expected destination address plus amount. Optional but helpful: the approximate send time and whether the asset is a native coin or a token (ERC-20 / BEP-20). Keep a note of the confirmation target your exchange lists for that asset. For XRP and similar networks, also record any memo or destination tag before you search—knowing that tag later helps explain why an explorer transfer looks successful while an exchange still shows nothing.
If the TXID is missing, you can still open the sending or receiving address on the correct explorer and locate the transfer in the history list. Address-only searches are slower but workable when exchanges delay hash display. Keep the sending wallet tab open so you can cross-check the same TXID. Within about one minute of broadcast, some indexers still show empty results—wait another minute before assuming the hash is wrong.
| Item |
Why it matters |
| Network / chain |
Selects the correct explorer index |
| TXID / transaction hash |
Direct lookup key for the transfer |
| Destination + amount |
Confirms the page matches the expected payment |
| Token vs native coin |
Points you to token-transfer rows when needed |
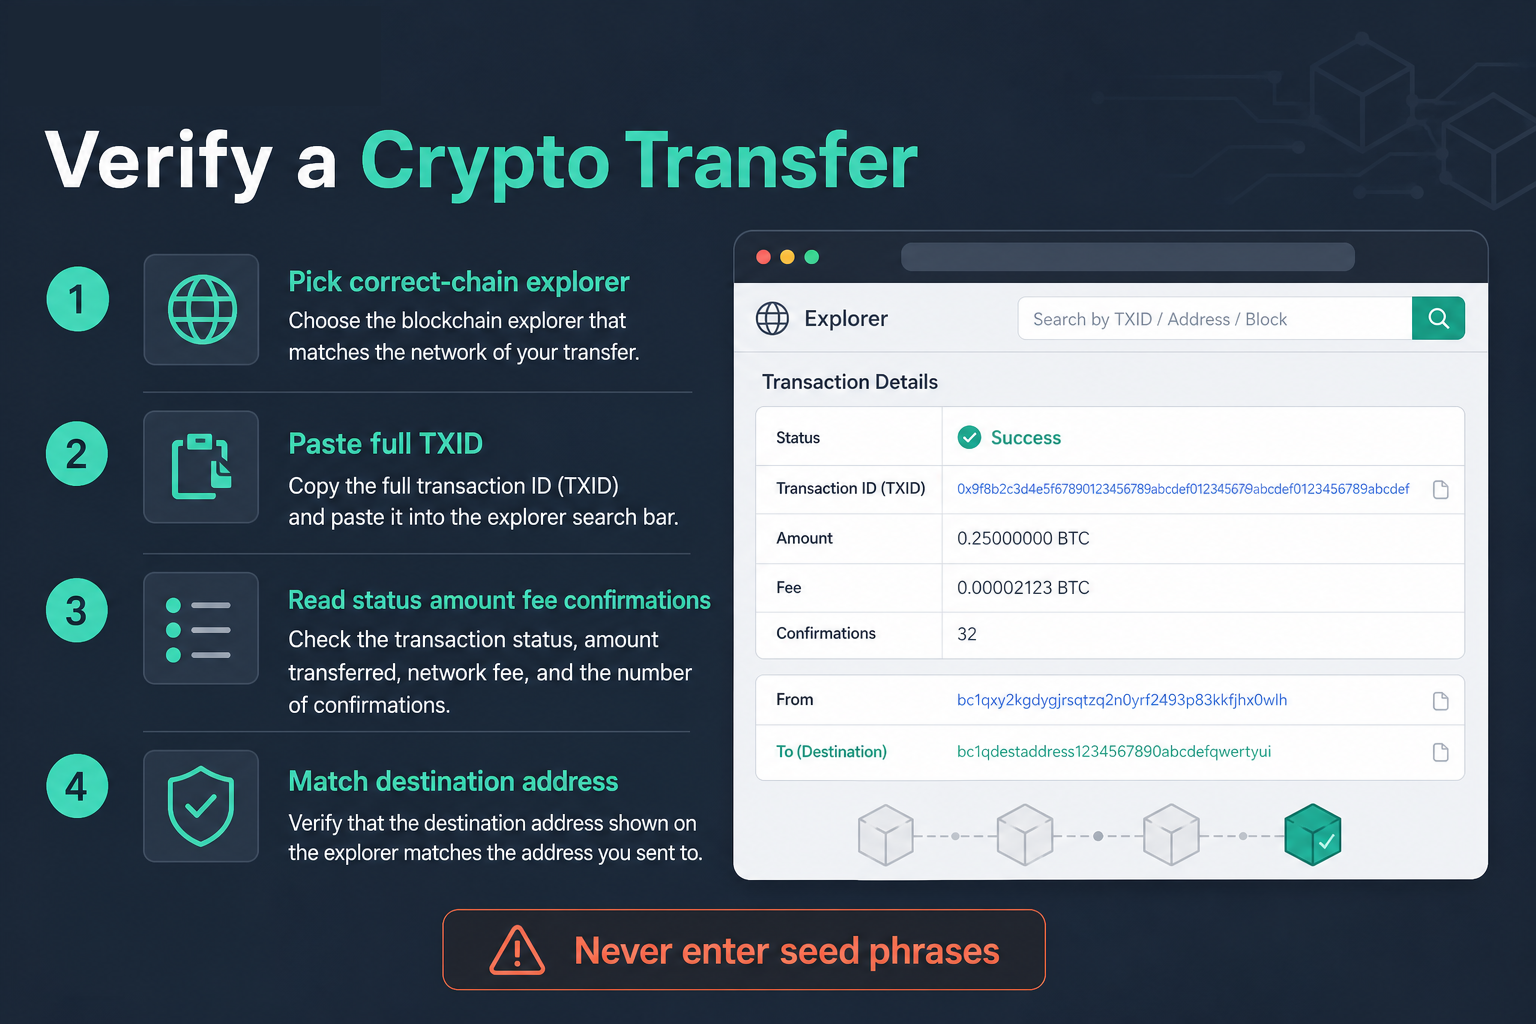 Figure 1. Verify a transfer: correct chain → full TXID → read fields → match destination.
Step 1: Choose the Explorer for the Correct Chain
Match the explorer to the withdrawal network. Ethereum transfers typically use Etherscan; BNB Smart Chain transfers typically use BscScan; Bitcoin transfers typically use Blockchain.com Explorer or another BTC-focused index. Selection criteria are expanded in Etherscan vs BscScan vs Blockchain.com. Using an explorer always starts with that match. If you send BTC on the Bitcoin network, do not paste the hash into an Ethereum explorer.
Open the site from a trusted bookmark. Do not follow unsolicited links that ask you to “verify” a deposit through a login form. Check a TXID only after you confirm the domain; fake pages often mimic wallet-connect or seed prompts.
Step 2: Paste the TXID and Open the Transaction Page
Copy the full TXID without spaces. Paste it into the explorer search box, submit the search, and open the transaction page. Confirm the hash on the page matches what you pasted—truncated hashes create false “not found” results. The same rule applies to block, transaction, and address queries: full strings beat partial copies. If a result row appears, click the hash once more so you land on the full detail view rather than a truncated list cell.
If search returns no result, re-check network choice and whether the transaction is still pending in a mempool view. Very new sends may take a short time to appear—an unconfirmed transfer can take about a minute to show after broadcast. On Bitcoin-style chains, the hash must be included in a block before confirmations rise. When fee pressure is high, low-fee transactions may stay unconfirmed longer—refresh the mempool or transaction page rather than assuming the TXID is wrong.
Step 3: Read Status, Amount, Addresses, Fee, and Confirmations
On the transaction page, verify success or failure status, the from and to addresses, the transferred amount, the fee paid, the block inclusion, and confirmation count. Look for a confirmations field, a block number, or a count that rises as later blocks arrive. For token transfers, open the token-transfer section so you do not confuse a tiny native gas payment with the token value moved.
Field-level reading tips for address and token pages are collected in Address, token, and contract data pages. Use those pages when the top summary line is not enough—especially for contract-mediated transfers. Beyond status, you can view fee details, timestamps, internal calls, and token logs that explain why a wallet balance changed.
When status is confirmed, note how many confirmations have accumulated. Successful does not always mean ready to use: a transfer can be included quickly yet still need more depth before an exchange marks funds received. An explorer “success” badge and a credited exchange balance are different checkpoints. For BTC deposits, platforms often wait for a higher confirmation count than a single-block success implies. For XRP deposits, also confirm the destination tag matches what the exchange issued.
Step 4: Cross-Check Against the Expected Destination
Compare the explorer’s “to” address with the deposit address you intended, character by character. Check that the amount matches within known fee behavior (some networks deduct fees separately). If confirmations are still low, wait for additional blocks before treating the deposit as final under the receiving platform’s rules. An explorer shows whether the ledger recorded a transfer to that address; platform credit can still lag.
Exchanges and custodial platforms set their own credit thresholds. Explorer confirmation count is network evidence; platform credit timing can differ. If the receiving wallet or exchange has not credited yet, keep the TXID handy and track additional confirmed blocks instead of re-sending. Do not send a second payment while you wait—duplicate sends create a second TXID you must track separately.
Common Errors and How to Fix Them
| Error |
Likely cause |
Fix |
| TXID not found |
Wrong chain explorer or truncated hash |
Switch network; paste the full TXID |
| Amount looks wrong |
Viewing gas/native row instead of token transfer |
Open token-transfer details |
| Pending for a long time |
Mempool congestion or underpriced fee |
Check fee/priority fields; wait or follow wallet replacement rules if available |
| “Success” but exchange not credited |
Platform needs more confirmations or wrong deposit memo/tag |
Confirm memo/tag requirements; wait for more blocks |
| Landed on unexpected address |
Wrong destination copied at send time |
Treat as irreversible on-chain; contact receiving support only with TXID evidence |
Other common mistakes include trusting truncated addresses, ignoring token tabs, mixing wallet screenshots with explorer details, and treating a wallet “pending” label as on-chain evidence before you open the hash page. Always view the full recipient string and verify the payment was included on the claimed network.
Whatever wallet you use, the pattern is the same: copy the TXID from the activity screen, open the matching explorer, and check details without exporting keys.
Is Checking a Transfer on an Explorer Safe?
Looking up public TXIDs and addresses on a reputable explorer is a standard verification practice and does not require sharing private keys. Explorers serve public ledger data only—they do not provide custody or signing. Safety breaks when users enter seeds into fake sites, install malicious extensions, or approve wallet pop-ups that appear during an “explorer” session.
Keep explorer use read-only. If any prompt asks for a seed phrase, private key, or payment to “unlock” the transaction, stop—the workflow is not a genuine explorer check. Never paste a seed into a page while you track a send. This article stays educational; related links above cover explorer selection and data-page reading in more depth.
Key Takeaways
Correct chain → full TXID → read status/amount/addresses/fee/confirmations → compare with the expected deposit. Most “missing transaction” reports are network mismatches or incomplete hashes. Explorers prove what the ledger recorded; they cannot reverse sends or substitute for platform deposit rules. Keep checking confirmation depth until the receiving side shows funds received.
FAQ
What is a TXID and where do I find it?
A TXID (transaction hash) is the unique identifier of a blockchain transaction. Wallets and exchange withdrawal histories usually display it after broadcast; copy the full string into the matching explorer to track the transfer. If you cannot find the hash yet, wait one more minute and refresh the withdrawal history before searching by address.
How do I check a crypto transaction if I only have an address?
Open the address page on the correct-chain explorer and scan recent transfers for the expected time, amount, and counterparty. Then open the specific TXID for full detail and check whether the payment was included and confirmed. Searching without a TXID is slower, but the same destination and amount checks still apply when funds show as received.
Why does the explorer show success but my exchange balance is unchanged?
The chain may have confirmed the transfer while the platform still waits for additional confirmations, reviews deposits, or requires a memo/tag that was omitted. Use the TXID as shared evidence with support and track confirmation count until funds are received. For BTC and other UTXO assets, the required confirmation count is often higher than for fast smart-contract chains.
Can a blockchain explorer steal my crypto?
A legitimate explorer only displays public data and cannot move funds. Theft risk comes from phishing sites and wallet prompts that impersonate explorers, not from read-only hash lookups on trusted domains. Keep the sending wallet separate from any site that asks you to “check” a seed. Public explorer information never includes private keys.